Images can be optimized before and after being uploaded to WordPress. We recommend optimization before uploading, as you’ll:
-Prevent WordPress from creating more thumbnail sizes than absolutely necessary.
-Perfect the image size and compression ahead of time with greater flexibility.
1. Image Size Rules of Thumb:
- Keep the resolution of images minimized to what you need.
- No image should ever need to be above 1MB
- Full screen images should be around 300kB
- Smaller images should be under 100kB, under 50kB when able
- At times, you’ll need to keep a larger size to retain quality, which is fine!
2. Checking what size images your website will need.
If you’re adding the image to a section or as a background, measure the size you will need and crop the resolution of your image to match. Excessively large image resolution is the biggest contributor to bloated file size.
One method to measure the size of your website’s sections is with Chrome’s developer tools:
Open the menu, the three dots in the top right corner of your Chrome browser window![]()
Go to More Tools -> Developer Tools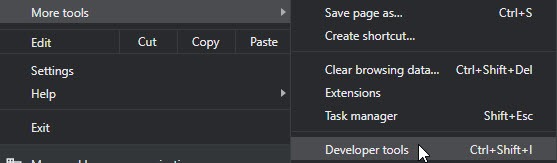
Now, if you move your mouse around your site, you should see the sections highlight. If not, click this button on the bottom bar
As you hover sections, you’ll notice the dimensions pointed out above. For example it would not be useful for us to upload an image larger than 480×340 pixels in this location: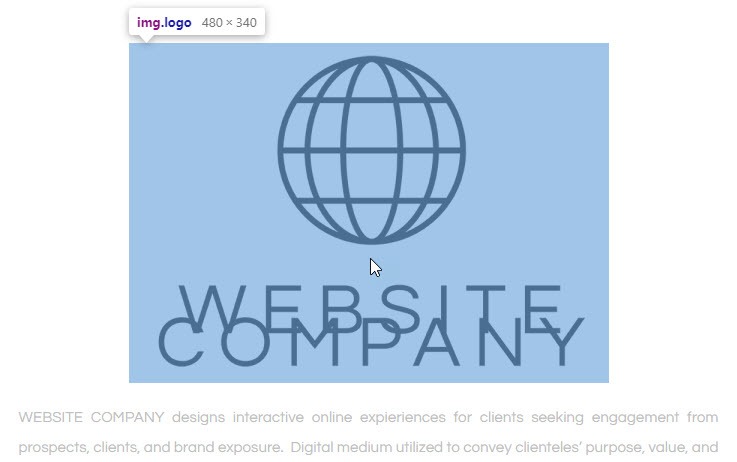
Once you know what size image to use, set the resolution accordingly in your favorite program. WordPress has a built in image editor, though it is limited. https://resizeimage.net/ is a free online tool you can use as well.
3. Compressing Image File Size – Before Uploading
Once your image is at an acceptable resolution, you’ll want to make sure it is compressed. Programs such as Adobe Photoshop allow for this, if you are familiar with their function. There are also some online / free alternatives available to use as well:
https://tinyjpg.com/ – Upload up to 20 at a time, we see great results with this tool.
https://bulkresizephotos.com – Upload as many as you like, easy to use.
4. Compressing Image File Size – After Uploading
Sometimes you wont have the ability to compress before, or you may need to go back through your library and optimize past images.
Try the plugin Imagify. Once installed, you’ll find generic settings in: Settings -> Imagify, and you’ll see individual image settings in the Media Library
There is a free plan that supports up to 25MB per month. There are also paid plans which can make bulk optimization a breeze.
Find two plugins to view all of WordPress’ disk space at a glance, and to sort the Media Library by file size here, in our post about Viewing File Sizes in WordPress’ Admin.